Charlotte Cake Recipe

This post may contain affiliate links. Read my disclosure policy.
This raspberry Charlotte Cake was my baby girls first birthday cake. She loved every part of it, the cake, the lady fingers and especially the raspberry mousse! This cake is as yummy as it is beautiful.
Of course this is our version of the classic French Charlotte Russe cake. Everyone seems to take their own spin on it. I love how the sweet/tart mouse and raspberry preserves complements the soft cake and lady fingers. European cakes are my favorite because they typically aren’t overly sweet but rather enjoyable. P.S. I was very detailed with my photos and instructions so you would succeed but this recipe really is not overly complicated. I hope you love this fantastic Charlotte dessert!

Ingredients for the Sponge Cake:
4 large eggs, room temperature
2/3 cup granulated sugar
2/3 cup cake flour (make your own with 2 ingredients!) *measured correctly
1/4 tsp baking powder
(7 oz pkg) Lady Fingers
3-4 Tbsp raspberry preserves or jam

Ingredients for Raspberry Mousse:
10 oz (2 1/2 cups) frozen raspberries
1/2 cup granulated sugar
Juice from 1 medium lemon (2 Tbsp for mousse + 1 Tbsp for simple syrup below)
1 Tbsp Knox unflavored Gelatin (from 1 1/4 packets)
3 cups heavy whipping cream
6 Tbsp confectioners (powdered) sugar
For the Simple Syrup, stir together:
1 cup warm water
1 Tbsp fresh lemon juice
1 Tbsp sugar
Topping/ Cake Decor for Charlotte Cake:
1 cup fresh raspberries and mint leaves for garnish

How To Make Charlotte Cake:
If you never made a European Sponge Cake, watch the video before you get started:
Make the raspberry syrup first:
1. In medium sauce pan, combine: 10 oz frozen raspberries and 1/2 cup sugar. Cook stirring occasionally until jam consistency. Remove from heat and strain through a sieve, pressing on the fruit with a spoon to extract as much raspberry juice as possible (you should get 2/3 cup syrup).

2. Into the raspberry syrup, stir in 2 Tbsp lemon juice and 1 Tbsp gelatin. Pour syrup back into sauce pan and place back over medium heat, whisk until gelatin is dissolved. Do not boil. Remove from heat and cool to room temp.

Make the Sponge Cake:
1. Line a 9″ springform pan with parchment paper. Preheat oven to 350˚F. In the bowl of your mixer with the whisk attachment on high speed, beat 4 eggs for 1 minute. Gradually add 2/3 cup sugar and continue beating on high 7 min until thick and 3 to 4 times in volume.
Tip: European sponge cakes really rely on the volume of the eggs to rise properly. Make sure to beat it long enough and don’t over mix after adding flour!

2. Stir together cake flour and baking powder then sift flour into whipped eggs in 2 additions, folding to incorporate between each addition. Scrape from the bottom to catch any hidden pockets of flour and fold just until incorporated – don’t overmix. Bake at 350˚F for 23-25 minutes or until top is golden and springs back when poked lightly.

3. Once it’s out of the oven, remove cake from pan by sliding a thin edged spatula around the edges. Transfer to wire rack, peel back parchment and cool to room temp. Then slice cake layers in half horizontally.

Assembling the Charlotte Cake:
Tip: If you want to serve it on something besides the bottom of the springform, place a 9″ cake circle on the bottom of your springform pan for easier transferring.
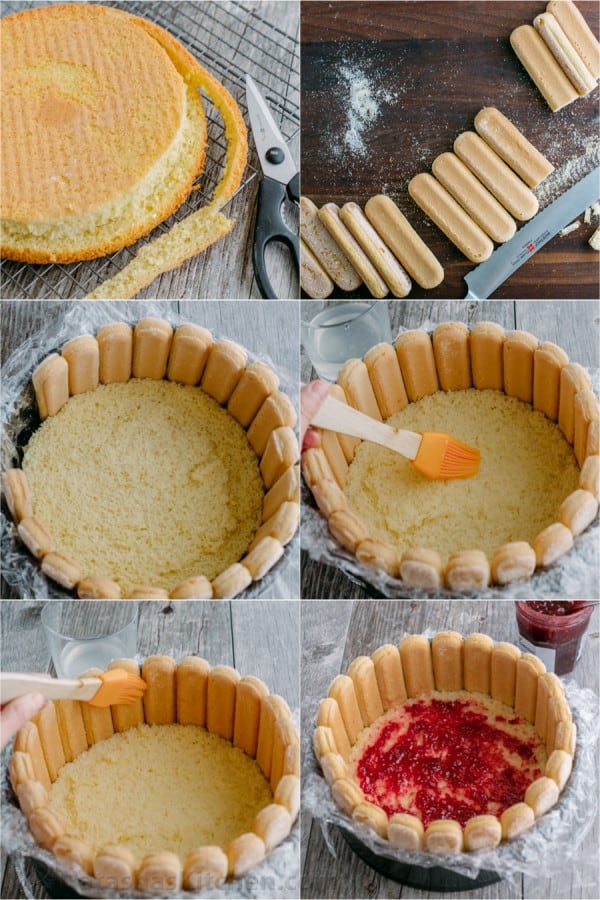
1. Cover springform walls with plastic wrap. Trim off 1/2″ all around the edges of both cake layers (I used kitchen scissors) and place the first layer into the bottom of your springform pan. Trim about 1/2″ off one end of all lady fingers. Place lady fingers in a tight ring, cut-side-down, around the cake base then brush cake with 1/3 of the simple syrup. Brush backs of lady fingers with 1/3 of syrup as well. Spread 1 1/2 Tbsp raspberry preserves over cake. Set aside.
2. With the whisk attachment, beat 3 cups heavy cream with 6 Tbsp powdered sugar on high speed until thick and spreadable. Remove 1 1/2 cups of whipped cream to a piping bag fitted with a star attachment and refrigerate to use as topping later.

3. Once raspberry syrup is completely at room temp (don’t wait way too long or it will thicken and become difficult to blend), fold it into remaining big batch of whipped cream adding 1/4 syrup at a time and folding between each addition. This is your mousse.

4. Spread 1/2 of the mousse over cake layer inside the springform. Top with second cake layer, brush with remaining simple syrup and spread with 1 1/2 Tbsp raspberry preserves. Add remaining mousse. Pipe whipped cream and top with fresh raspberries and mint leaves if using. Cover with plastic wrap and refrigerate until set (3 hours or overnight). To serve, remove springform walls and plastic wrap.


Charlotte Cake Recipe with Raspberries

Ingredients
For the Raspberry Mousse:
- 10 oz 2 1/2 cups frozen raspberries
- 1/2 cup granulated sugar
- Juice from 1 medium lemon, 2 Tbsp for mousse + 1 Tbsp for simple syrup below
- 1 Tbsp Knox unflavored Gelatin, from 1 1/4 packets
- 3 cups heavy whipping cream
- 6 Tbsp confectioners, powdered sugar
For the Sponge Cake:
- 4 large eggs, room temperature
- 2/3 cup granulated sugar
- 2/3 cup cake flour, make your own with 2 ingredients!
- 1/4 tsp baking powder
- 7 oz pkg Lady Fingers
- 3-4 Tbsp raspberry preserves or jam
For the Simple Syrup, stir together:
- 1 cup warm water
- 1 Tbsp fresh lemon juice
- 1 Tbsp sugar
Topping/ Cake Decor for Charlotte Cake:
- 1 cup fresh raspberries and mint leaves for garnish
Instructions
Make the raspberry syrup first:
- In medium sauce pan, combine: 10 oz frozen raspberries and 1/2 cup sugar. Cook stirring occasionally until jam consistency. Remove from heat and strain through a sieve, pressing on the fruit with a spoon to extract as much raspberry juice as possible (you should get 2/3 cup syrup).
- Into the raspberry syrup, stir in 2 Tbsp lemon juice and 1 Tbsp gelatin. Pour syrup back into sauce pan and place back over medium heat, whisk until gelatin is dissolved. Do not boil. Remove from heat and cool to room temp.
Make the Sponge Cake:
- Line a 9" springform pan with parchment paper. Preheat oven to 350˚F. In the bowl of your mixer with the whisk attachment on high speed, beat 4 eggs for 1 minute. Gradually add 2/3 cup sugar and continue beating on high 7 min until thick and 3 to 4 times in volume.
- Stir together cake flour and baking powder then sift flour into whipped eggs in 2 additions, folding to incorporate between each addition. Scrape from the bottom to catch any hidden pockets of flour and fold just until incorporated - don't overmix. Bake at 350˚F for 23-25 minutes or until top is golden and springs back when poked lightly.
- Once it's out of the oven, remove cake from pan by sliding a thin edged spatula around the edges. Transfer to wire rack, peel back parchment and cool to room temp. Then slice cake layers in half horizontally.
Assembling the Charlotte Cake:
- Cover springform walls with plastic wrap. Trim off 1/2" all around the edges of both cake layers (I used kitchen scissors) and place the first layer into the bottom of your springform pan. Trim about 1/2" off one end of all lady fingers. Place lady fingers in a tight ring, cut-side-down, around the cake base then brush cake with 1/3 of the simple syrup. Brush backs of lady fingers with 1/3 of syrup as well. Spread 1 1/2 Tbsp raspberry preserves over cake. Set aside.
- With the whisk attachment, beat 3 cups heavy cream with 6 Tbsp powdered sugar on high speed until thick and spreadable. Remove 1 1/2 cups of whipped cream to a piping bag fitted with a star attachment and refrigerate to use as topping later.
- Once raspberry syrup is completely at room temp (don't wait way too long or it will thicken and become difficult to blend), fold it into remaining big batch of whipped cream adding 1/4 syrup at a time and folding between each addition. This is your mousse.
- Spread 1/2 of the mousse over cake layer inside the springform. Top with second cake layer, brush with remaining simple syrup and spread with 1 1/2 Tbsp raspberry preserves. Add remaining mousse. Pipe whipped cream and top with fresh raspberries and mint leaves if using. Cover with plastic wrap and refrigerate until set (3 hours or overnight). To serve, remove springform walls and plastic wrap.
If you make this recipe, I’d love to see pics of your creations on Instagram, Facebook and Twitter! Hashtag them #natashaskitchen

Seriously delicious! Enjoy this my friends 🙂

Natasha Kravchuk

 Hi! I'm Natasha Kravchuk. Here you'll find delicious, trusted recipes with easy step-by-step photos and videos.


I am utilizing this cake for a Thanksgiving cooking contest! But I need to incorporate chocolate too, was thinking of dipping LF’s in melted chocolate and having them stick to the cake that way. Anyone ever try?? Need to bring home the trophy!
Hi Erin, I haven’t tried that yet but we’d love to know how it goes if you give that a try!
Would agar-agar work in place if gelatin? I suppose I need to boil the syrup with agar-agar (unlike gelatin)? Also, will it be an issue when combining with the cream as the syrup temperature will be a little warmer?
Hi Jen! I have not tested this recipe with agar agar so I can’t say for sure what other substitutions would have to be made in this recipe.
Hi! Can this be made this with blueberries instead of raspberries? I’m throwing a baby shower that’s blue themed (It’s a boy) and would love to make this but can’t do a “pink” dessert! Thanks!
Hi Jill, I imagine that will work. Here’s what one of my readers wrote: ” I used raspberries and blueberries for the jam and mousse. I also added a couple more tablespoons of sugar to the simple “syrup” and about half a cup more powdered sugar to the heavy cream because I didn’t think it would be sweet enough, and it was perfect in the end (and I’m always saying desserts are too sweet)! Love it for summertime.” I hope that helps.
Thanks Natasha,
Nice recipe, very concise instructions, works perfectly, looks beautiful!
Thanks, David. Appreciate it!
Love your blog!
Can I use strawberries instead and can I make it today ,Friday,
for EasterSunday?
Thank you
Hi Jeanie! I think you could make it work with equal amounts of strawberry syrup but I do think raspberries have more flavor than strawberries.
Hi, I’m excited to try this out. I was wondering what adjustments would I need to make if I will be using a 6 in pan? Thank you!
Hi Ren! I’m sorry, I don’t have those measurements since I have not tested this in different sizes. I recommend looking at a cake pan conversion chart online to help with that. Then you can adjust the number of servings at the top of the recipe card to help. I hope you love the recipe.
After I’ve mixed a whipped cream with a raspberry syrup, my mousse curdled. 😶 I guess it’s because the syrup has a lemon juice in it, and a heavy whipping cream is a dairy product. Maybe it’s supposed to be like that, but I doubt it. I don’t know if I can serve a cake with a curdled filling.
Hi Sasha! The lemon juice is cooked which reduces the acidity and helps prevent curdling. Did you wait for the raspberry syrup to be completely at room temperature? Also, curdling is most common when over-mixed. This syrup should be added in portions, 1/4 at a time, and folded into the whipped cream gently. I hope that helps.
I’ve made a lot of Charlottes but this is by far my favourite! A great, light summer dessert. You really have to make sure the raspberry syrup doesn’t set too much. You have a very short window between ‘cool’ and ‘starting to set’ – so be ready!! 🙂
Hello Maggie, lovely to hear that you just found your new favorite recipe! Thanks a lot for the good comments and feedback.
I’ve made this recipe twice and both times it sank. I’ve watched the video and looked for tips. I have no idea what I am doing wrong.
Hi Kim, It’s more likely that you may have undermixed the eggs and sugar. This recipe relies on the volume of the eggs and sugar.
This is such a great cake. Thank you.
The only change I made was I baked the sponge cake in a 8″ cake pan instead of the 9″spring pan.
Sounds good, I’m glad that worked out well! Thank you for the review, Candee. We appreciate it!
Hi Natasha
Can i use strawberry fruit instead of raspberry fruit?
Thanks.
Hi Fanny, I think you could make it work with equal amounts of strawberry syrup but I do think raspberries have more flavor than strawberries.
Thanks natascha .
I did raspberries mousse like a filling for chocolate cake today really good.
Thanks again.
You’re welcome! I’m so happy you enjoyed it, Fanny!
I have made this cake three times now and it is always a crowd pleaser! I misread the directions previously and was dipping the lady fingers into the syrup (just the back half) and then putting them around the cake. I have never had any issues with them falling off or anything. I did read the instructions this time around and I’m hoping that they do not fall off this time 😅 will update. Thank you for this fabulous recipe!
You’re very welcome! I hope it turns out great!
Hello, I’m a little confused about the syrups. When do you use the simple syrup? Once you’ve strained the raspberries, which part are you using – the liquid or what’s left over from the sieve?
Hi Michelle, you should get 2/3 cup syrup in the cup after pressing the fruit through the sieve. I have photos of the syrup process in the recipe, I recommend reviewing those for clarity. We mention the two times where we used the syrup under the “Assembling the Charlotte Cake” instructions both in step one, where you brush the cake with 1/3 of the simple syrup & in step 3, we mention we fold it into the remaining big batch of whipped cream adding 1/4 syrup at a time. I hope this is helpful.
I wasn’t to good with the lady fingers so I made mine simpler. My family loves it.
I had a hard time with having the lady finger stay stuck when serving. So I made it without and we loved it.
My 8 year old daughter asked if I would teach her to bake, this was the cake she wanted to try on her own (She’s baked with me in the past as my helper).Well, it turned out amazing! What a beautiful cake. She needed help navigating the recipe, but did 90% of the recipe independently. Thanks for a great recipe! Delicious!
Wow, great job to you both! It makes me so happy to know that you’re spending some time baking and cooking. I hope you’ll both enjoy all the recipes that you will try.
Would the lady fingers just stick the cake once done? Are they going to be hard and crunchy still after set? How do you cut it?
Also the gelatin in the syrup what is the purpose for this?
Hi A, yes, the outside ones are crunchy. I recommend taking a look at the second photo of the recipe, we cut the cake between the ladyfingers.
I made the Raspberry Charlotte for a friends 21st Birthday. It was a hit!!! So light and the taste was heavenly! I ordered the ladyfingers you used from Amazon. Love their crunch as oposed to the soft American ones. Will absolutely make again!!!!
Perfect! Glad the recipe was a hit, Thereasa. Thank you for your review!
Hi
Could you plz send me these measurements in grams instead of oz.
It seems to me tempting and I want to try but confuse in oz
Hi there, my new recipes have the conversion to grams if you click Jump to recipe and Metric. This is an older recipe and doesn’t have that feature yet but feel free to use this free Ingredient Weight Chart for assistance.
Hi Natasha!
I’ve made this before and want to ask if you think it can be frozen before the fresh raspberries, whipped cream and mint are added.
Hi Sylvia, I honestly haven’t tried freezing this cake so I”m not sure how it would hold up. It seems like it would work, but without testing, I can’t recommend it.
Is it possible to double the Charlotte cake recipe in an extra large cake pan so I may serve a group??
Hello Sue, I haven’t tried that yet to advise but I imagine that will work. If you do an experiment, please share with us how it goes.
Hello Natasha:
Today I am going to prepare this cake for my baby (31yrs). A little bit nervous but I will be sharing the results.
Happy Holidays to you and your beautiful family.
God bless you always!!!
It is my first time here.
Thank you, Maureen! Blessings to you and your family!
Easy to follow instructions for a very impressive looking cake. I have one chilling in the fridge ready to cut tomorrow and send out on my Afternoon Tea deliveries. Thank you for sharing such stunning recipes. Xx
You’re welcome! I’m glad you’re enjoying our recipes!
I made this cake twice now and it’s been such a great hit! It’s amazingly fresh, and light. I’m not very good at piping and this cake looks so polished with the inner layers and exterior ladyfinger edge–it makes me look like a better baker than I should get credit for. I’m making the Berry Tiramisu now!
That’s just awesome Laura! Thank you for sharing that amazing review with me!
I’m making this cake tomorrow for both my boyfriend and his mother’s birthday, I just got all the ingredients today and I’m so excited! I happen to be an avid baker so I think I can handle this recipe, I just had a few questions. Do you know the length of the ladyfingers you used? The ones I bought seem a lot smaller, and I had to buy three packages as each were only 3 oz each. Also, if I use AP flour instead, do I adjust the measurements, or is it the same amount as the cake flour?
Hi Brenna, we used this ladyfingers HERE. I hope this helps!
Wanted to make this for my dad’s birthday after watching them make it on the Great British Baking Show. Loved the sponge cake and will probably be making it again soon! Just let the mixer do all the work. I used raspberries and blueberries for the jam and mousse. I also added a couple more tablespoons of sugar to the simple “syrup” and about half a cup more powdered sugar to the heavy cream because I didn’t think it would be sweet enough, and it was perfect in the end (and I’m always saying desserts are too sweet)! Love it for summertime.
That’s so great! Thank you for sharing that awesome feedback with me!
Can the sponge cake be baked the day before? Or is it best the same day?
Hi Eleonora, you can definitely make the sponge ahead. You could also assemble the whole cake a day or even 2 days ahead. For the decor to look it’s best, I would suggest adding the whipped cream and raspberries to the top closer to serving time.
I’m a pretty solid baker, but I tried making the sponge cake twice and both times it was soggy in the middle. I followed the recipe to the letter–what the heck am I doing wrong?!?!
Hi Jennifer, I highly recommend watching the sponge cake video and reading through the troubleshooting tips in this sponge cake post.
Made this for Mother’s day and it came out beautiful and delicious. Reminded me of raspberry lemonade. Can’t wait to make it again!
Love it, Annette! Thank you for your great feedback.
For what altitude was this recipe written? I need to know if I should make high altitude adjustments
Hi Ainslie, the city where I live has an elevation of 2,730 ft
Such a gorgeous cake! I first made this in summer, as a birthday cake for a beautiful young Slovakian girl. I used strawberries instead of raspberries and tied a red ribbon to hold it all together..she loved it! And just tonight I used components of this recipe, plus your mascarpone whipped cream mixture, to make a Christmas trifle. I included ladyfingers (made my own), yellow cake layer, custard, lemon curd, your raspberry mousse, and the mascarpone/whipped cream mixture. It will be fabulous! Thank you Natasha for the guidance and inspiration!
That’s so great!! Thank you for sharing that with me, Holly! I’m so glad you’ve enjoyed this recipe.
Thank you so much for the recipe, it looks wonderful to make and of course, to indulge !
Fabby
You’re welcome! I’m so happy you enjoyed it, Fabby!
How do you transfer from springform once its set? I’d like to serve on my cake stand.
Hi Valentina, It get’s a little tricky with the lady fingers on the sides and you run the risk of some of them getting dislodged but yes you can carefully remove it from the base. It may help to line the bottom with plastic wrap as well so it slides off more readily.
Want to make this beautiful cake for a dinner party. Natasha, rather than plastic wrap, do you think a ribbon or lining of parchment paper would work just as well as the plastic wrap?
Hi Sylvia, I have wrapped the borders with parchment for my no-bake cheesecake and it worked well. I think it would work here as well.
I made this cake for our 4th of July BBQ this year. I try to make something different every time we get together unless someone requests something. I saw this made on the Great British Baking Show. I knew this was this year’s dessert. I made my own Lady Fingers tho. So much better to do that. This dessert was so good. There was 1 piece left and it was eaten the next day. It’s been requested to be made again. The raspberries are from my garden. I put a few blueberries from my garden on top to make it Red, White and Blue.
That’s just awesome!! Thank you for sharing your wonderful review, Gabrielle!
That’s why I made it too! Love that show!!
Thank you for the great recipe! It was easy to follow and fun to make. Cake turned out beautifully and everyone loved it!
I’m so happy to hear that Joanne! Thank you for your amazing feedback!
Hi, I just have a question. How far in advance of an event can you make this cake? And how long will it keep once it’s been cut?
Thank you!
Hi Sharon, I think it could be made up to 2 days ahead for it to look it’s best. It will keep up to 4 or 5 days after it is cut or as long as the raspberries remain fresh. I suggest covering the cut side with a piece of plastic wrap before covering the cake fully to refrigerate. See more suggestions on cake storage in this post.
The Photos for this cake are gorgeous & the recipe looked easy enough, but the cake flour recipe does not work. I thought I had overmixed & tried the recipe 3x. Each time at 10 minutes into baking, the cake would collapse & dimple about .5″ from the edge of the pan & little balls of cake flour would be dispersed throughout.Then I noticed on your video, you use all purpose flour. I tried the 4th time with all purpose flour & it finally worked.
Hi Misao, you can definitely use all-purpose flour but I did use cake flour in this recipe for a lighter fluffier cake. I would suggest going through the troubleshooting suggestions in our sponge cake to see if anything is different in your process. Both flours should work equally well.
Hi Natasha,
Thank-you for the troubleshooting link. Can you please confirm if this recipe has been made with a National Brand cake flour (ie King Arthur’s Flour or Robin Hood)? Or has this recipe only been made with your homemade cake flour using the all purpose flour and corn starch blend?
Hi Misao, I have made it with store-bought cake flour as well as homemade cake flour with the same results.
Made it first time and it came out very good, everyone loved it and my family is very picky when it comes to food.
I’m so happy you enjoyed that. Thank you for sharing that with us!
Made this for a luncheon as a finally.
I did have problems with the sponge. It sank in the middle, not sure why this happened Used the sponge any way and dessert went well and was enjoyed.
Hi Maria, It’s more likely that you may have undermixed the eggs and sugar. that is usually the culprit! I’m so happy you still enjoyed that!
Thank you for the recipe! I made this cake for my daughter’s 1st birthday, and it was literally gone in 10 minutes. Because it tasted A-MAZING! And looked beautiful as well! Thank you for all that you do!
That’s just awesome!! Happy First Birthday to your daughter!! Thank you for sharing your wonderful review 🙂
Hi Natasha
Thank you so much for the recipe
Which cake recipe is correct ?
Because in video tutorial the recipe is deferent with 6 eggs etc in your raspberry are 4 eggs
Thanks
Hi Gelly! The video recipe is a different version that the original recipe. We explained that at the beginning of the post. There were a few changes made. I hope this helps 🙂
Hi Natasha
I want to make this with mango instead of raspberry. Can you please suggest me whether to use frozen mango or fresh mango to make syrup?
Hi Ananya! I haven’t tried this particular recipe with mango, however, the amount of puree that is called for in the recipe may not be enough of a flavor punch since mango flavor is generally more mild than raspberries. I think it could be a good experiment, but the raspberry version would probably have more flavor.
Hi Natasha! Absolutely love your recipes…a quick question though, what if I substituted agar agar powder instead of the gelatin? Would I still achieve the same results? Thanks in advance!
HI Nazish, I have not tested this recipe with agar agar so I can’t say for sure what other substitutions would have to be made in this recipe.
i’m wondering how you get a round cake to put in the springform pan when your directions say to ‘cut the cake in half and trim’. when cutting in half you have a straight side. so how does it become a round cake to put in the pan?
thanks for clarifying
Hi Nadia! When cutting it in half we mean cutting it horizontally into layers to make two cake layers. There is a photo for reference in the original recipe. 🙂 Hope this help, Enjoy!
maybe directions should include ‘horizontally’. thanks for clearing that up.
Updated and thank you for the suggestion!
Super easy and fun to make! Your instructions are so easy to follow! I enjoyed the video for the sponge cake it was very helpful! Thanks so much for sharing all the dads on Fathers Day loves it!!!
You are very welcome Cora and thank you for making our recipes 😀
I made this for my little girls 3rd birthday, it was delicious!!! Thank you so much Natasha! Everyone loved this cake!
You’re welcome Lena! I’m glad to hear the recipe is a hit. Thanks for sharing your wonderful review!
WOW!!! so grateful to find your site!
I made the Charlotte cake for my mom’s birthday. So far, it has prepared beautifully. Tonight’s taste will reveal all.
I am always asked to bring dessert and I have recently been challenged to make lactose free desserts. Thankfully there is lactose free whipping cream available.
Oh my!!!
I’m glad to hear how much you’re enjoying my site Shannon! Please let me know what everyone thinks of the recipe!
Everyone loved it…. I have multiple requests for future birthdays. One thing I am going to try is rather than brush with simple syrup I am going to brush with a raspberry liqueur (not Chambord too pricey…lol).
One question though…. my cake fell in the middle (saddle). Not sure if it’s because my oven isn’t right temp or I over folded.
Hi Shanon, I’m so happy you all loved it! 🙂 For the sponge cake, check out our post on how to make this classic sponge cake – that post covers most of the troubleshooting issues for sponge cakes. I hope that helps! 🙂
Hi Natasha,
I’m making the cake tonight for my daughter’s 2nd birthday 🙂
We are huge lemon fans. Can we kick up the lemon a notch, without disrespecting your well thought out and tested recipe?
Thanks!
Reagan
Hi Reagan, it should still work to add an extra Tbsp of lemon juice to the mousse and another one to the simple syrup to make it more pronounced. I hope you love it!
Thank you so much, can’t wait!
My pleasure Reagan!
Hi Natasha!
I made this for my boyfriend on Valentine’s Day and he loved it! It was so pretty to look at and the raspberry flavor was lovely! Best of all, it was a lot easier than it looked. 🙂
I had a bit of an ‘oops’ moment while cooking the raspberries–I misread the directions and ended up actually *making* jam, which didn’t exactly fold in well with the whipped cream. 😅 On the second attempt, however, it all came together wonderfully.
I’ll definitely be making this again. Thank you so much for sharing this recipe!
My pleasure Danielle! I’m glad the recipe was a success and that both you and your boyfriend enjoy the recipe. Thanks for sharing your fantastic review!
Awesome. Can’t wait to try it.
I hope you do! Please let me know what you think of the recipe Betty!
Hi Natasha, In the video you say all purpose flour and in the recipe it says cake flour, which one do I use?
Thanks
Hi Alex, for this particular one, I used cake flour for a softer crumb but if you only have all-purpose flour, it will work 🙂
Hi Natasha,
I just made this cake and it’s in the fridge until tomorrow. Can’t wait to try it! Question… When I was making the raspberry syrup and added the gelatin, stirring over medium heat for a few minutes, some of the gelatin never dissolved. I had a few pieces of gelatin floating that I later removed. I found a few pieces of gelatin in the mousse too. Do you know why is that and what can I do next time to make sure all gelatin fully dissolves? Thank you so much!
Hi Anna, I would suggest keeping it on lower heat so it can fully dissolve without boiling it. Also, was it a fresh packet of gelatin? I haven’t had that happen in this recipe so I hope that helps!
Hi Natasha, can any part of your wonderful cake be made ahead of the day that it is to be served? Thanks! Happy holidays, Sue
Hi Sue, the sponge cake can easily be made a day ahead, covered and left at room temperature then apply the syrup and assemble the next day 🙂
Hi Natasha,
If I wanted to make and assemble the entire cake ahead of time, how far in advance could I do that?
Thanks for your time!
~Lisa
Hi Lisa, You could assemble the whole cake a day or even 2 days ahead. For the decor to look it’s best, I would suggest adding the whipped cream and raspberries to the top closer to serving time.
Hi Natasha,
I’m really looking forward to make this cake but before I do that I just have one question, will the amount of sugar in the sponge affect it in some way? Because unfortunately I only have measuring cups with grams on them, I’ve converted all the rest of the ingredients except the sugar, different websites give me different results.
Hi Alexia, 1/2 cup of granulated sugar is about 100 grams and 2/3 cup of granulated sugar is about 133 grams. I hope you love it!
Natasha this looks amazing but I just want to verify that the simple syrup ingredients are not a typo – is it 1 cup water to only 1 tablespoon of sugar and lemon juice??? I’ve made lots of simple syrup in the past but it was always 1 cup to 1 cup so just wanted to make sure before I get myself in trouble.
Great question! That is correct and not a typo. We didn’t want the cake to get too sweet and found this to be the best balance 🙂
Can I make the sponge cakes gluten free? Will it still turn out the same?
Hi Kimberley, I haven’t tested it myself but I have had several readers report great results with making the sponge cake with gluten free flour.
Hi, this recipe looks amazing!!
I just have one question, would I be able to use agar agar instead of gelatine and if yes the same amount?
Thanks
Hi Alex, I have not tested this recipe with agar agar so I can’t say for sure what other substitutions would have to be made in this recipe.
Hello Natasha
I love your blog. I was reading up this recipe and wondering if I could use the same mousse recipe with mangoes instead.
Appreciate your response.
Thanks!
Hi Maria, I haven’t tried this particular recipe with mango, however, the amount of puree that is called for in the recipe may not be enough of a flavor punch since mango flavor is generally more mild than raspberries. I think it could be a good experiment, but the raspberry version would probably have more flavor.
Hi Natasha,
I just made this cake for my birthday tomorrow. It is now sitting in the refrigerator. Can’t wait to see the final product tomorrow. Wish me luck.
In fact, I’m a bit worrying about the cake layers, I’m afraid it would be too soggy after brushed the simple lemon syrup, 1/3 cup for each looks a lot to me. And my cake layers are very sticky. Not dry.
Thanks for your recipe.
P.S. I originally planned to make Black Forest Cake, but I did not find any fresh / frozen / canned cherries, so I made this Raspberry Charlotte Cake instead.
Hi Venus, the cake layers should be moist after adding the syrup but not sticky before adding it. That could be due to underbeating the eggs and sugar which is what would cause the cake not to rise and bake up properly. The cake relies on the volume of the whipped eggs and sugar for leavening so that step is critically important for the cake layers to work. I suggest watching our sponge cake tutorial so you can see exactly what the batter should look like. It’s difficult to say without being there, but I hope you love the recipe!
Hi Natasha, thanks for your prompt response. I also thought about this, however, maybe not underbeat?! Maybe underbake?! In fact, the eggs were beaten to about triple size, and the cake did rise up. The only difference is I am using 8″ springform pan instead of 9″. I only had 8″ size. And my baking time was around 35 mins. The toothpick came out a bit sticky but no batter on it.
Anyway, tomorrow will be the moment of truth. I will know. 🙂
Thanks & Cheers!
Finally, it turns out ok. The taste is good but a bit wet. If I will do it again, may not use all syrup. Thanks for the recipe.
Thank you for such an excellent recipe! I love that you include an estimated cost and great directions on how to make a sponge cake. I’m making this now for a family get-together.
You’re welcome Meredith! I’m glad you found it helpful! Please let me know what everyone thinks of the recipe!
HI Natasha
By using the hard Ladyfingers do they get soft after refrigeration once assembled>
Hi Sharilyn, yes they do absorb the syrup and soften 🙂
Hi Natasha, I made a sponge cake without adding baking powder. Why do you use baking powder in your recipe?
Anyway instead of raspberry jam I used blackberry preserve and the cake turned out to be very good .
Hi Julia, I have done it with and without baking powder and I think the baking powder gives me slightly more consistent results (a more level top), but it absolutely works without the baking powder. 🙂
If I double the recipe how much Gelatin should I use?Thanks
Hi Julia, if doubling, I would double everything proportionally.
I love that this recipe uses natural simple ingredients. Thank you for posting; I can’t wait to try it.
My pleasure Sara! Please let me know what you think!
I am making this right now. my question is about the simple syrup. all the simple syrups are a cup of water to a cup of sugar, yours is only a tablespoon. Why?
Hi Debbi, we don’t like our syrups to be overly sweet but you can add more sugar if you prefer 🙂
Hi Natasha 😊
I was wondering, can I bake the sponge cakes in the 9″ springform.. and then assemble it in a 10″ springform ring without cutting away 1/2″ of the cake?
Hi Inna, I think that would work, but keep in mind the cake will be shorter since you are spreading your mousse slightly thinner. It won’t be a big difference but you may need to trim the lady fingers a little more if you don’t want them sticking up higher and also you will need a few more lady fingers to fit the larger springform. Great question! 🙂
Hi Natasha,
So I made 2 9″ cakes, doubled the mousse and assembled it in a 10″ springform ring without trimming the lady fingers. We loved it! 😋😋😋
Fantastic! I’m happy to hear that Inna! Thanks for sharing your great review 🙂
Hi,
I have a daughter who has been begging me to make this cake, but she isn’t really a fan of barries in general, so she wants me to use peaches instead of raspberry’s, is that posseble or it not work?
I mean I know how to makes peach marmelade, but this is a little out of my comfort zone, any advice would be helpful.
Thanks
Hi Unn, I haven’t tried making a peach version of this cake but I think it would work well. I do have this peach mousse recipe that would probably work well in this recipe also.
Not sure what I was doing wrong because my sponge cake kept falling. I tried it twice. Did everything exactly how the recipe said. I’m usually pretty good with baking things but for some reason it just didn’t want to stay up. Is there anything I could be doing wrong??
Hi Barb, it is very immportant to make sure you beat the eggs and sugar long enough with a high powered mixer on high speed for the time specified. This cake relies on the volume/air in the whipped eggs as leavening and without beating it properly, it will not rise. Check out my post and watch the video on how to make this classic European sponge cake which should help!
Try to raise your baking time(at least 23 minutes), that’s why I think mine fell.
Hi Olga, I usually bake 23-25 minutes (my oven is closer to 25 minutes).
I remember making this genoise sponge cake in high school for my cooking practical! It was very tasty but if you’re not mindful it can come out uneven or having falling/rising issues so you have to be sure you aren’t over-mixing the batter. Also, I would suggest using brandy, lime juice or some other type of liquor to eliminate the egg scent because it can smell a bit raw seeing that many eggs are used in this recipe.
Thanks for sharing your helpful suggestions and tips with other readers Tassiia!
Are the lady fingers the soft or the crunchy kind? I always puzzle over which kind are correct to use in different kinds of recipes. Thanks. This looks delicious and lovely!
Hi Carolyn, these are the crunchy kinds 🙂
How far ahead of time can this cake be made? I was thinking to make all components on Friday and assemble on Saturday before we eat it or would it be OK to assemble the whole thing on Friday? I just don’t want anything to get soggy! Thanks!
Hi Meagan, it would be ok to assemble the whole thing on Friday. For the decor to look it’s best, I would suggest adding the whipped cream and raspberries to the top on Saturday before serving. The cake layers keep really well without getting soggy. I hope you love it!
Hi,
This is beautiful!! Just a question. In your video the recipe is for 2-9 in cakes and the written recipe is for 1?
Thanks,
Patti
I’m sorry that wasn’t clear. The video was intended to show what the cake batter texture should look like. It is a European sponge cake and Even though the recipe is really simple with just a few ingredients, it has helped people to see what the fluffy better should look like. For this cake, follow the instructions as written out in the recipe above. You only need to make one 9 inch cake layer for this specific recipe.
Thank you!! This will be so pretty for Easter desert
My pleasure Patti!
Hi Natasha,
Can’t wait to try this recipe! Just two questions for you! Can you swap out frozen raspberries for fresh without changing anything? Also when making the raspberrie syrup for step 2 you say to remove it from the heat again but I am wondering am I adding the gelatin to just lemon juice or right into the raspberry after it has been through the sieve?
Thanks so much! Love your site.
Hi Anthony, sorry I wasn’t super clear on that step. I updated it to read easier: Once the syrup is off the heat and strained: “Into the raspberry syrup, stir in 2 Tbsp lemon juice and 1 Tbsp gelatin. Pour syrup back into sauce pan and place back over medium heat, whisk until gelatin is dissolved. Do not boil. Remove from heat and cool to room temp.” Let me know if you still have questions 🙂
Hello Natasha,
I will be baking your cake which looks amazing and wondering if I could use vegetarian gelatine instead of normal one? Thanks you
Veronika
Hi Veronika, I wish I could say for sure but I haven’t tested that substitution so I’m not sure what ratios to recommend. I searched the comments and didn’t see anyone mentioning it – I even searched my other mousse recipes. If you test it out, let me know how it goes! 🙂
Thank you so much for your reply Natasha. So I bought vegetarian gelatin ( Vege-Gel by Dr. Oetker) and by mistake I put in 1 tsp instead of 1tbsp and it work out well in the end. The cake was delicious but I had issue with lady fingers to stay aside so I have put a ribbon around the cake to hold everything together. Any tips how could I improved that?
Thank you for sharing that substitution!! I’m sure that will be really helpful for someone doing the same thing. It helps to keep the springform ring around the cake while it sets and not remove it early so the ladyfingers in the pan mold to the mousse as it sets in the refrigerator.
Can I use raspberry jello instead of the unflavored gelatin?
Hi Julie, I haven’t tried it so I’m not sure how much you would have to substitute since they don’t substitute straight across. Without testing it, I can’t really advise you on that. Wish I could be more helpful!
Love it!💝
That’s great! Thanks for sharing Karina 😀
Hi, I am thinking to make this for my daughter but we have a lot of strawberries. Will this work with fresh strawberries instead of frozen and how would you go about that? Thank you.
I haven’t tried it with strawberries but I think you could make it work with strawberries. I think raspberries give more flavor for the same amount of berry syrup though. If you try it with strawberries, let me know how you like it!
also is it best to make the day of serving or the day before?
Hi Olga, I think the frosting looks prettiest on the day 1, but you could do it either way 🙂
the recipe calls for 2/3 cup of cake flour. How do I mix that with flour and cornstarch, I cannot do the math right now haha. please help.
Hi Olga, I think the easiest thing to do is to make 1 cup of cake flour and use 2/3 of it, otherwise the measurements get kind of wonky and hard to measure out.
can you taste the cake part of this cake? I am debating wether to make it as a birthday cake for a an adult?
You can taste the cake part. The mousse is the star of this cake but the adults enjoyed it when I served it to them 🙂
Thanks for the great recipe! I made this gorgeous and delicious cake yesterday for the first time. We’ve enjoyed it to the very last piece. The raspberry mousse was just amazing!
Your review put a huge smile on my face! Thank you for sharing Anna 🙂
So I may have screwed this up by making the mousse while I waited for the cake to come out of the oven and adding the simple syrup to the mousse instead of onto the cake itself. Is all hope lost? WIll it set if I freeze it? What should I do? (I’m in Boston right now. Freezing anything is not a problem right now.)
Oh no! I’ve never mixed the simple syrup into the mousse so I am not sure if it will set or not. I really just have no idea what advice to give at this point. That is such a bummer! I hope you’re able to save it.
Hi Natasha, Could you use the soft ladyfinger from the bakery vs the hard cookie, or do you recommend usijng the hard cookie and letting it soften with the mousse?
Hi Michele, I haven’t tried that but I do think it would work to use a soft cookie 🙂
Great recipe. It’s very accurate and the result is awesome. I only made one minor adjustment, skipping the lemon juice and taking half of the amount of sugar for the raspberry syrup. It has been a big succes finishing our family Chrismass diner 🙂
Thank you for sharing your great review!! 🙂
Hi Natasha, I made this gorgeous and delicious cake for Christmas day. It was a hit!!
Thanks for the recipe!
I’m so glad you enjoyed it!! Have a happy New Year!! 🙂
Wow, your recipe is incredibly detailed and explained super clearly! i am really forward to making this cake!
Thank you Ally! 🙂 I am sure you will love it as much as I do!
Hi Natasha, I am very excited to try this recipe. I am making it for a Christmas neighbor party this Saturday. I have a question, why do you cut 1/2″ off the lady finger? I was thinking of making the actual cake in a 8″pan and then use an adjustable ring and expand it to about 8″1/2-9″ and put the whole lady finger arouns the 8″cake. (If that makes sense). Curious to know if the cutting of lady finger is more for a clean look at the bottom or if there is actual reason. Thanks agai ! Can’t wait to taste it 🙂
Hi Eleanor, I cut the lady fingers to give the cake a clean look at the bottom and it helps to create a better seal at the base for the cake to stay together. Great question!
Thanks again for your quick response the other day. I mad the cake yesterday for a neighborhood holiday party and I did NOT cut the lady fingers and it still came out amazing. So I baked the cake in an 8″ pan and then I used a Stainless Steel Adjustable Size Mousse Ring expandable cake ring. I adjusted so the cake and ladyfingers would fit snug. And I was able to set the cake on a cake stand. It was easy to unmold and no need for plastic wrap. The cake came out great and every loved. The only issue I did have was when it came to unmolding the cake , i cut it in half and set the top side on a cooling rack and then it stuck to the rack. Luckily the cake was not the main thing so I was able to put it back together and mousse covered the imperfections ;-). The best part of the recipe is how SIMPLE it was! I was originally going to make a Fraisier but had SO many steps and I was short on time. This was great. Thanks again :-*
I am so glad to hear that Eleonor! Merry Christmas 🙂
I love your cakes. You are amazing. I’m from Peru I used gelatin with flavor but now I learn with you recipe to use fruit purée. In my country have a cake named Torta Helada .
I’m so glad you’re enjoying my recipes! 🙂
Hi, so I wanted to make two cakes so I doubled the recipe for the sponge cake and baked both at the same time. They both sunk in the middle and were kind of falling apart when I took them out of the pans to cool. Did I over mix? They were baked thru. was it something else? Thanks!
Hi Mariya, if you want to make a bigger batch, follow this sponge cake recipe. It’s more likely that you may have undermixed the eggs and sugar. With 8 eggs in the mixer, you would probably have to beat the eggs and sugar about 12 minutes on high speed (you can’t really over beat the eggs for this recipe).
You don’t cook the simple syrup? Just stir together? Seems awfully watery, not syrupy.
Hi Amy, just stir together. It’s intended to moisten the cake. It’s not necessary that it be syrupy 🙂
Natasha, I will be making this cake tonight for my daughter’s birthday and have a question: after the cake sets in the fridge you said to remove the wall and plastic. What about the bottom circle? would it be possible to remove the circle and transfer the cake onto a regular plate?
It get’s a little tricky with the lady fingers on the sides and you run the risk of some of them getting dislodged but yes you can carefully remove it from the base. It may help to line the bottom with plastic wrap as well so it slides off more readily.
Natasha, just wanted to thank you for your quick response. I ended up just putting the cake on the cake circle without the bottom of the spring form. Also, this cake is amazing, it’s light and rich at the same time. It looks more complicated than it actually is so that was another great thing about it. Thank you!
I’m so happy you liked it and it’s always nice to be pleasantly surprised that it’s easier than it looks! I sometimes wonder if my photos do me in on that point – I try to be thorough so folks have the best success rate but then it looks long and complicated 😉 Thanks for the great review!
Hi Natasha,
I made this cake for my Baba for her birthday and it was such a hit! Thanks for sharing and the step by step was fantastic!
Question, do you think you could use the mousse as a piped frosting on a cupcake??
Hi Sammi, I haven’t tried it that way but I think it would be difficult to gauge when it’s just the right consistency for it to pipe well without sliding off the cupcake.
I did it! I let the mousse chill for about an hour and then I piped it onto the cupcakes just like usual! Turned out great and everyone was raving about them! Thanks for the great recipes!
Thank you so much for reporting back and sharing that with me! I will have to try that! What cupcake recipe did you use?
I’m a little embarrassed to admit this….but just a boxed chocolate cake mix using butter and a teaspoon of instant coffee granules. I put a little big of raspberry jam in the centers and topped them with edible glitter. Boxed cake mix glammed up! Haha
I wouldn’t judge that for a second! I’m all about shortcuts 🙂 Those cupcakes of yours sound pretty glamorous!! If you posted a pic somewhere, I’d love to see it! 🙂
My mom loves raspberries, so I made this cake for her B-day and she loved it. I am not much of a baker and was a little hesitant to try because of so many steps but it turned out great. Thank you, Natasha for your blog and great tasting recipes:).
Oksana, thank you for the nice review and I’m happy to hear that the cake turned out great 😀.
This cake looks divine!! I’d love to make it for my daughter’s birthday, but would it still be good if I made it on Saturday morning/afternoon and we didn’t eat it until Sunday night?
Hi Olya, yes that would work fine, just cover and refrigerate until ready to enjoy 🙂
Hello Natasha. I’m a fan of your recepies. Thank you for sharing so kindly.
I love this Charlotte recipe. If I use strawberries instead raspberries, do you think will work too?
Hi Sara, I’m so glad you enjoyed the recipe 🙂 I think you could make it work with equal amounts of the strawberry syrup but I do think raspberries have more flavor than strawberries.
This recipe is so good. The cake looks so pretty and tastes heavenly good! I was not a fan of mousse cakes. This cake totally changed my mind. Love it!
Vicky, I’m so happy you enjoyed the cake. Thank you for sharing that with us 😁.
Lovely cake! Do you top with whip cream & raspberry garnish prior to setting in the fridge or right before serving?
Hi Lena, I have done it both ways and it works both ways. What I like about piping the whipped cream on before it goes into the fridge, is it that it softens the lady fingers on top so they are uniformly softened.
Hello Natasha!
I love your blog! My husband is Russian born (I’m Canadian born) and I’ve made him many of your Eastern European recipes which he enjoys! I really want to make your Charlotte cake next. What kind of star tip did you use for piping? I have a Wilton 1M, is that ok? Cheers!
Hi Laura, thank you for sharing that with us :). Yes a Wilton 1M will work great. I believe I used the same one.
Awesome, thanks for the fast response! (^.^)/
What a stunning creation! It looks so beautiful and feminine too:). I love raspberries in cakes. I’ll have to make it for a special occasion.
Thank you Olga! All of my nieces loved it and thought it was a perfect princess cake 🙂
Gorgeous cake! I have a difficult time finding lady fingers.. I have tried 6 stores already lol. And whole foods and the cheeper stores, they say it’s seasonal. So where did you buy your lady fingers?
Yelena, I found them at local Co-op store. If you won’t find them, Amazon has them.
Such a beautiful cake! Made this today and it’s setting overnight in the fridge right now. Can’t wait to devour it tomorrow.. although I ran out of plastic wrap and omitted it completely.. do you think it’ll make much of a difference? What’s the reason for the wrap?
The wrap just keeps the cake from sticking to the walls of the springform. It’s not crucial to the success of the recipe and would still probably work fine without it. I hope you love the cake! 🙂
Sister brought this cake to Easter dinner, it was SOO delicious! I may have had a slice this morning for breakfast… One thing I’d recommend is to use stabilized whipped cream for the decor on top. My favorite way to make stabilized whipped cream is to beat 2 teaspoons cream cheese and add 1 cup heavy whipping cream gradually, add sugar, vanilla and beat until stiff peaks form. The cream cheese doesn’t alter the flavor of the finished product and your piped creations last a week refrigerated and stay put for hours outside the fridge.
I love the idea of making stabilized whipped cream naturally with a little cream cheese. Thank you for sharing that tip!!
Hi Natasha, where did you find lady fingers cookies?
I purchased them at a store called the Boise Co-Op. I’d recommend calling your local grocery stores. Not all stores have them (surprisingly!) and it will save you time and money from having to drive around and figure out who sells them and who doesn’t. That’s what I did ;).
Lol found the answer to my question!
Can I not use the lady fingers?
Sarah, cake can be made without lady fingers. They are not vital to the success of the cake. You could just frost the outside or leave boarders as is 😀. Let me know what you end up doing.
Simply gorgeous, Natasha! What a way to celebrate your baby girl’s first birthday 😀
Thank you Patty, we sure made some nice memories 😀.
Hello Natasha, would it be ok to substitute raspberries for strawberries instead? Thanks!
I think raspberries provide a little more flavor for the amount of syrup but yes I do think it could work. Just be mindful of how much syrup you are adding. You might end up with more juice from strawberries. You don’t want to add too much syrup or your mousse won’t firm up properly.
Ok I will make it exactly like you except i will decorate it on top eith some strawberries 🙂 ;)Thank you Natasha!
This is beautiful! How long can it sit on the counter before it starts to melt?
At room temperature, it’s probably safe for 2-3 hours. I wouldn’t leave it out longer than that because of food safety reasons since it has dairy in it but it probably won’t melt much longer than that. I haven’t tested the limits on this cake but I’d say a good 4-5 hours at a room temp of 65-73˚F.
Hello Natasha! This cake look so yummy! I have a baby boy shower coming up. Do you think substitution with blueberries and blackberries instead of raspberries would work?
Julie, blackberries will give a purple color and blueberries don’t give very much fruit syrup of flavor. You might try the filling for this cake, using the blue jello. Let me know how it works out.
Hi, this cake looks really good. I just want to know if it’s ok instead of making raspberry syrup, can I use raspberry jello, and instead of whipping cream, cold wip… It’s just a question, the cake looks really really good…. Thank you for sharing you’re recipes with us, I am making a lot of food from you’re blog… God bless u
Hi Abigail, yes, you could use the filling for this cake (jello and cool whip) to make the mousse. That will also taste delicious and it’s even easier 🙂 God bless you also!
The cake looks lovely! Plan on making it this weekend. Did you use a 9″ pan? Just wondering because I only have a 10″ one and wanted to know if that would work?
Olga, I used 9″ pan. 10″ should work, but you will need more lady fingers and your cake won’t be as tall. Let me know how it turns out 😀.
Love that gorgeous pink color! Perfect for a little girls birthday!
Thank you so much! It really is, or for a bridal shower or girls baby shower 😉
Wow this cake looks soooooo very tantalizing and really very mouth watering gotta try after Passover if I don’t have plain gelatin on hand would a few tsp of milk work gotta try tho love fruit and cream
Hi Tzivia, you really need the gelatin for the mousse to form, otherwise it will just be watered down whipped cream after adding the syrup without any gelatin. I’m not sure if this helps or not, but if you work quickly to assemble the cake before this mousse sets, you could use this recipe instead for the mousse part: https://natashaskitchen.com/2014/11/25/raspberry-jello-cake-recipe-video-tutorial/ It’s basically raspberry jello and cool whip.
Oh ok gotcha I definitely don’t wanna have a watery runny cake lol I will hafta look into that video tutorial love your videos @ is wow cannot wait to try in weeks to come gurl
WOW! What a stunning cake! Love the precise instructions and link to cake flour. Pinned. Thanks for sharing. Happy Easter to you and your family!
Hi Mary! Thank you so much for the wonderful compliments 🙂 It really means so much to us! Have a wonderful and blessed Easter! 🙂
This is so pretty, Natasha! Your little girl is very lucky to have you making her food like this! 🙂
That’s so sweet of you to say, but really it is we who are so blessed to have our sweet little lady. I’m so thankful and I will probably spoil her with all kinds of yummies over the course of her life. I can’t resist 🙂
As we approach Holy Week I would like to wish you and your family all the blessings of Easter. He is Risen alleluia
Thank you so much. He is risen indeed! Have a wonderful and blessed Easter! 🙂
Gorgeous cake Natasha. Looks so refreshing, perfect for Easter.
Thank you so much Inessa :). I wasn’t thinking of Easter when I made it but I agree, it would make a very pretty Easter cake 🙂
This is beyond gorgeous!!! I’m looking for interesting cakes/sweets for my daughter’s Garden Tea Party Bridal shower in June of this year. This cake will look amazing!!!
It would be gorgeous at a bridal shower. A garden tea party sounds so lovely! Congratulations and blessings to your daughter! 🙂
I’ve never tried making a charlotte before, but this might be my motivation–looks absolutely amazing! Love those layers of fruity mousse 🙂
Thank you June! I’m so happy you found inspiration here! 🙂
What is “cake flour “
Hi Natasha, sorry I totally forgot to link to my cake flour tutorial! It’s just all purpose four and corn starch sifted together. So easy! Here’s the video tutorial
That cake looks so gorgeous Natasha! wishing your little princess a very happy birthday!
You’re so sweet. Thank you twice! 🙂
what a beautiful cake! I will have to remember this one after our Easter/Pascha on May 1st! what a wonderful Spring / Summer cake! So pretty! Well done! Bravo! 🙂
ps: you mean mint leaves when you wrote basil, I think! 🙂
Thank you Elizabeth, it was fun to make 😀. I updated the recipe with mint.
You mean mint leaves not basil:)
Luba, thanks for pointing that out, I got it fixed 😀